
Remote Orca Servers
Keep Orca running on another computer and connect from your laptop.
A Remote Orca Server lets one computer do the work while another computer provides the UI. The server keeps the projects, worktrees, terminals, tabs, provider accounts, and agent sessions. Your laptop connects to that running Orca instance.
The easiest setup is the Orca desktop app on both computers, connected through Tailscale. You do not need to run orca serve for this path.
What runs where
Client computer · Orca client
  Shows the UI and sends your input
                 │
                 │ private network route
                 ▼
Server computer · Orca server
  Stores repos and worktrees
  Runs terminals and agents
Install and authenticate Codex, Claude Code, OpenCode, git, and any provider CLIs on the server computer. A login on your laptop does not automatically carry over to the server.
On a headless orca serve host, register managed Claude/Codex accounts from the server shell (the remote client disables Add account):
orca account add --agent claude
orca account add --agent codex
orca account list
Install or refresh agent skills without a Settings UI:
orca skills install --skill orca-cli --skill orchestration
orca skills update --all
Recommended: desktop app + Tailscale
You need:
- Orca installed and updated on both computers
- Tailscale installed on both computers
- Both computers signed in to the same tailnet
- The server computer awake, online, and running Orca
Tailscale gives the server a private address that usually starts with 100.. Orca puts that address first in its connection-address picker.
1. Create an access link on the server
On the computer that should keep the sessions running:
- Open the Orca desktop app.
- Open Settings → Remote Orca Servers.
- Under Advertise this app as a server, click New Link.
- For Connection address, select the Tailscale address. It usually looks like
100.x.y.z. - Click Generate Access Link.
- Copy the link under Pair another Orca client.
If the Tailscale address is missing, confirm Tailscale is connected and click the refresh button beside Connection address.
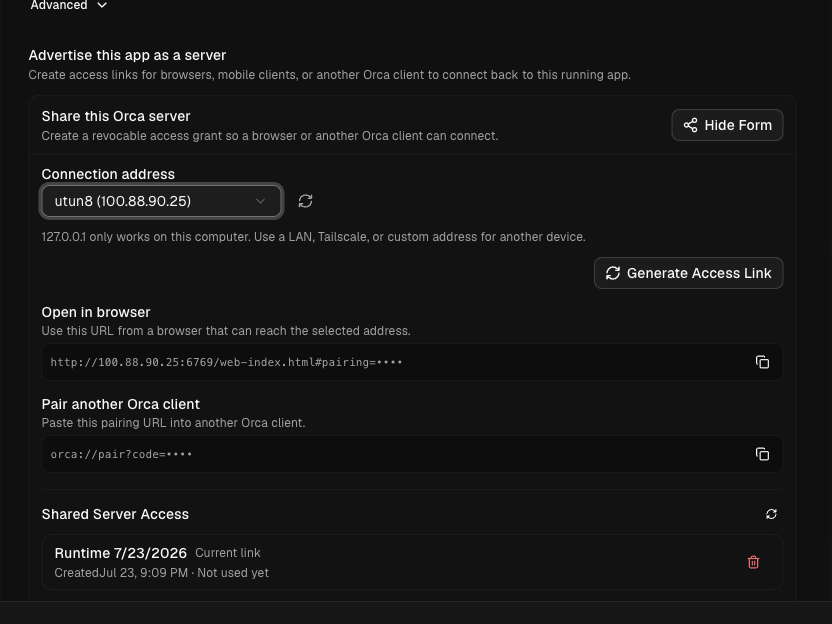
2. Add the server on your laptop
On the computer you want to use as the client:
- Open Settings → Remote Orca Servers.
- Click Add Server.
- Enter a recognizable name, such as
Remote Server. - Paste the access link from the server.
- Click Add Server.
- If the saved server shows Disconnected, click Connect.
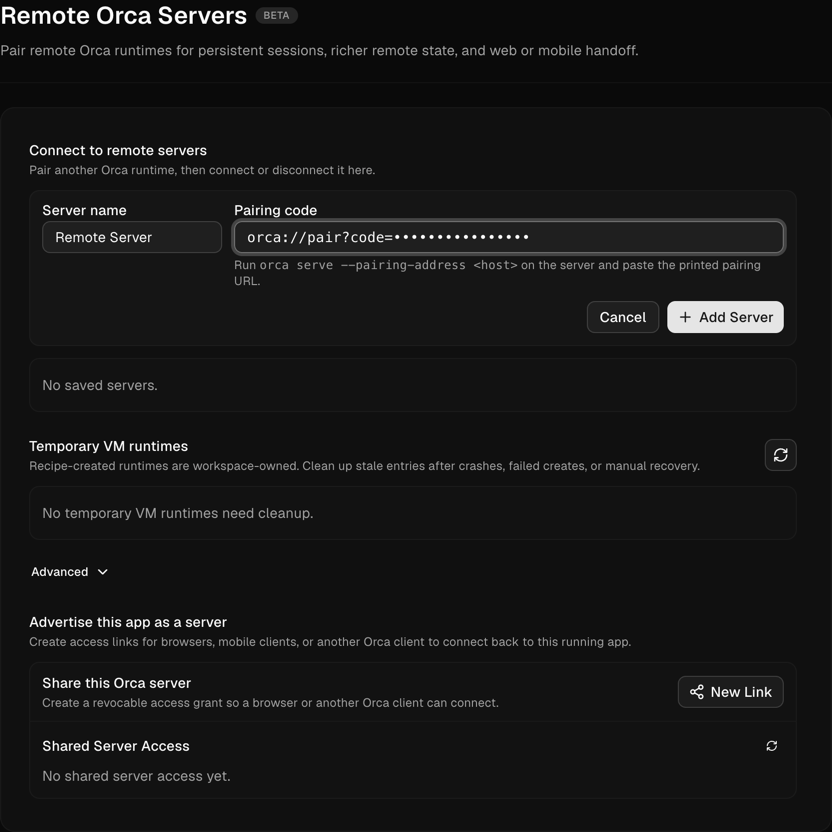
Adding a server saves it without forcing every new project onto it. Open Advanced → Active Server only when you want server-routed projects, terminals, provider checks, and browser or mobile handoff to use that server by default.
Use the remote server
Once the server shows Connected, select it or one of its projects and use Orca normally. Terminals, agent processes, files, worktrees, and session state live on the server computer.
That means:
- agents keep running when the client laptop sleeps or disconnects;
- the server needs the repository, tools, and credentials used by those agents;
- the server must stay awake and connected to the tailnet;
- reconnecting the client returns you to the server-owned state.
Access and security
Orca creates a separate, revocable token for each paired client. The server lists these under Shared Server Access.
- Click the trash button beside a grant to revoke it. Active clients using that grant are disconnected immediately.
- Generating another link replaces the previous unused link. Clients that already paired keep their own grants until you revoke them.
- Keep Tailscale ACLs or grants as narrow as your setup allows.
- Do not forward the Orca port directly to the public internet. Prefer Tailscale, WireGuard, a trusted LAN, SSH forwarding, or an authenticated tunnel.
- Do not select
127.0.0.1for another computer. That address only works on the server itself.
Alternative: orca serve
Use orca serve when the host should run without the desktop window—for example, a headless Linux server or a service-managed VM. For a MacBook or desktop you can leave signed in, the in-app setup above is simpler.
Install Orca and its bundled CLI on the server, then run:
orca serve --pairing-address <server-tailscale-ip-or-hostname>For example:
orca serve --pairing-address 100.64.1.20The command:
- starts the Orca runtime without opening the desktop window;
- runs in the foreground until you press
Ctrl-C; - prints the bound endpoint and a runtime pairing URL;
- uses
--pairing-addressonly for the address clients should dial.
Paste the printed pairing URL into Settings → Remote Orca Servers → Add Server on the client.
Add --port 6768 when a firewall, tunnel, or service definition requires a fixed port:
orca serve --port 6768 --pairing-address 100.64.1.20Use only one host mode at a time. If the Orca desktop app is already sharing that computer, do not start a second orca serve process for the same setup.
Mobile from a headless server
For the Orca mobile app, request a mobile-scoped QR code and link:
orca serve --pairing-address 100.64.1.20 --mobile-pairingKeep the phone on the same tailnet, open Orca Mobile, choose Pair, and scan the terminal QR code or paste the printed link.
Desktop app or orca serve?
| Desktop app on the server | orca serve | |
|---|---|---|
| Best for | An old laptop, Mac mini, or desktop | A headless Linux box, VM, or managed service |
| Setup | Settings and buttons | Terminal command and service configuration |
| Server window | Open | None |
| Access link | New Link → Generate Access Link | Printed in the terminal |
| Lifetime | While the desktop app is running | While the foreground process or service is running |
Remote Orca Server or SSH?
Use SSH worktrees when Orca on your laptop should own the runtime and use another machine only to run selected worktrees and terminals.
Use a Remote Orca Server when the other machine should own the full Orca runtime and preserve shared sessions for desktop, browser, mobile, or automation clients.
See Ways to run Orca for the full comparison.
Troubleshooting
The Tailscale address is not listed
On the server, confirm Tailscale is connected, then click the refresh button beside Connection address. Both computers must be signed in to the same tailnet. A Tailscale IPv4 address usually starts with 100..
The server is disconnected
Confirm the server computer is awake, Orca is still running, and Tailscale shows both devices online. Check your tailnet ACLs or grants if one device cannot reach the other.
Update Orca on both computers if the server row reports an incompatible protocol version.
The access link was shared with the wrong person
On the server, open Settings → Remote Orca Servers → Shared Server Access and revoke that grant. Generate a new link for the intended client.
The server cannot find an agent CLI
Install and authenticate that CLI on the server computer. Remote sessions use the server's PATH, home directory, and credentials—not the client's.
orca serve advertises the wrong address
Stop the command and restart it with an address the client can reach:
orca serve --pairing-address <reachable-tailscale-ip-or-hostname>Do not use a wildcard address or 127.0.0.1 for a remote client.
Next steps
- Compare every run mode in Ways to run Orca.
- Use SSH worktrees when the laptop should own the Orca runtime.
- See the Orca CLI reference for
orca serveflags and automation commands.